Wrapping C with Python: 3D image segmentation with region growing
 Segmentation of a "tangle cube" that was encased in an outer, cube-shaped shell.
Image segmentation with region growing is simple and can be used as an initialization step for more sophisticated segmentation methods. In this note, I’ll describe how to implement a region growing method for 3D image volume segmentation (note: the code here can be applied, without modification, to 2D images by adding an extra axis to the image) that uses a single seed point and uses a neighborhood average inclusion criteria. First, we’ll implement the algorithm in Python, and next, I’ll show how to implement the algorithm in C, wrapping the C code using f2py in order to make it callable from Python. Implementing the code in C will give us big performance boosts, while wrapping the code in Python will gives all the convenience of scripting in Python.
Table of Contents
Pseudocode
First, let’s describe the algorithm in some pseudocode:
method grow(image, seed, neighborhood_size)

Initialize 'segmentation' to boolean volume, same shape as 'image'.
Initialize 'checked' to a boolean volume, same shape as 'segmentation'.
Initialize empty stack, 'needs_check'.

Set 'segmentation' and 'checked' at 'seed' to true.
Add neighbor coordinates of 'seed' to 'needs_check'.

while 'needs_check' is not empty:
    Pop 'point' from 'needs_check'.
    Set 'checked' at 'point' to true.

    if the average of 'image' over 'neighborhood_size' distance from 'point'
       is greater than or equal to the value of 'image' at 'point'
    then
        Set 'segmentation' to true at 'point'.
        Add neighbor coordinates of 'point' to 'needs_check'.
    end if
end while

return 'segmentation'
end method grow
We’ve glossed over a few details that will appear in the actual implementation, but in a nutshell, the pseudocode says that whenever the image value at a point is above (or equal to) the average image value in the neighborhood of that point, we set the corresponding point in segmentation to “True” and add all the neighbors of that point to a stack to be checked later. When there’s no points left to check, the boolean segmentation volume will (hopefully, roughly) indicate where the object is in the image volume.
It’s worth mentioning at this point that using the neighborhood average as the inclusion criteria will have a rather large effect in the final segmentation outcome. Indeed, we are assuming the object is “bright” relative to its surroundings. Generally speaking, this inclusion criteria should be guided by the application domain at hand and by the interpretation of actual image values. For example, in CT scans the image values correspond to Hounsfield units (which correspond to tissue density), and thus our region growing routine with the inclusion criteria as is would find connected regions of high density for CT data.
Generating an image volume for testing
We’ll generate a synthetic volume for testing, rather than depending on some external data source. Specifically, we’ll use implicit surfaces of the form,
\[x^4 - 5x^2 + y^4 - 5y^2 + z^4 - 5z^2 = k\]and we’ll use ranges of $k$ to define regions of higher and lower image values. Wolfram MathWorld calls this surface a tangle cube for $k=-11.8$.
The code below creates an image volume that has value 1 in regions where $5 \leq k \leq 20$ and where $k \leq -11$, and has image volume -1 otherwise. We also view the two regions using mayavi.
import numpy as np
from mayavi import mlab

nx = 61; ny = 51; nz = 71;

tx = np.linspace(-3,3,nx)
ty = np.linspace(-3,3,ny)
tz = np.linspace(-3,3,nz)

x,y,z = np.meshgrid(tx,ty,tz)

w = x**4 - 5*x**2 + y**4 - 5*y**2 + z**4 - 5*z**2

vol = -np.ones_like(w)
vol[np.logical_and(w >= 5, w<=20)] = 1.
vol[w <= -11] = 1.

src = mlab.pipeline.scalar_field(w)

mlab.pipeline.iso_surface(src, contours=[5,20], opacity=0.5)
mlab.pipeline.iso_surface(src, contours=[-11], opacity=0.5)
mlab.show()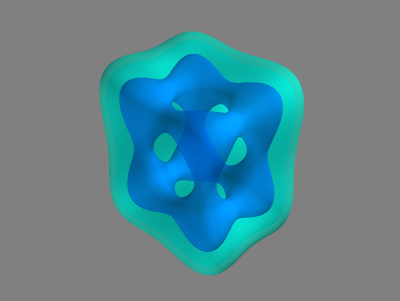
The figure on the right illustrates the two regions in the image volume. The light blue region corresponds to the outer shell $(5 \leq k \leq 20)$ that encloses the inner region $(k \leq -11)$. So, we can see that by planting the seed for the region growing in the inner structure, we should (hopefully) obtain only the inner structure since the inner region is not connected to the outer shell. Note that in the code above, we’ve also used different numbers of points to sample along the x, y, and z axes to reveal any potential flaws in this aspect of the implementation.
As another means of looking at this test volume, we could look at cuts through the volume, using the following code, for example:
|
 |
Python implementation
Now then, let’s translate the pseudocode to Python (always a relatively easy task!):
import numpy as np

def grow(img, seed, t):
    """
    img: ndarray, ndim=3
        An image volume.

    seed: tuple, len=3
        Region growing starts from this point.

    t: int
        The image neighborhood radius for the inclusion criteria.
    """
    seg = np.zeros(img.shape, dtype=np.bool)
    checked = np.zeros_like(seg)

    seg[seed] = True
    checked[seed] = True
    needs_check = get_nbhd(seed, checked, img.shape)

    while len(needs_check) > 0:
        pt = needs_check.pop()

        # Its possible that the point was already checked and was
        # put in the needs_check stack multiple times.
        if checked[pt]: continue

        checked[pt] = True

        # Handle borders.
        imin = max(pt[0]-t, 0)
        imax = min(pt[0]+t, img.shape[0]-1)
        jmin = max(pt[1]-t, 0)
        jmax = min(pt[1]+t, img.shape[1]-1)
        kmin = max(pt[2]-t, 0)
        kmax = min(pt[2]+t, img.shape[2]-1)

        if img[pt] >= img[imin:imax+1, jmin:jmax+1, kmin:kmax+1].mean():
            # Include the voxel in the segmentation and
            # add its neighbors to be checked.
            seg[pt] = True
            needs_check += get_nbhd(pt, checked, img.shape)

    return seg
This python code works just like the pseudocode, but we have taken care of a couple of extra details:
- A point might be placed in the stack multiple times before its checked. So, if the point has already been checked, we add a check to just continue to the next iteration of the
whileloop. - We handle the special cases at the borders with an ugly six lines of code (
imin,imax, etc.).
The code uses a get_nbhd function which is not yet written. This function adds neighboring voxels when necessary. It accepts the current voxel (pt), the indicator array of checked points (checked), and the dimensions of the volume (img.shape). The checked indicator is of course necessary so we don’t add points that have already been checked, and the volume dimensions argument is necessary so we don’t add points beyond the image borders.
Next, there is a connectivity choice for adding neighbors of a voxel, i.e., the choice of which voxels are considered the neighbors of a given voxel. This is determined by the get_nbhd function and should not be confused with the neighborhood that is used for computing the average image value about a voxel (the latter usually being a comparatively larger region). Rather, this neighborhood defines the coordinates (i.e., voxels) that are adjacent to a given coordinate. There are different ways to define the neighborhood on a 3D lattice, and I use a 6-voxel neighborhood in the code below:
def get_nbhd(pt, checked, dims):
    nbhd = []

    if (pt[0] > 0) and not checked[pt[0]-1, pt[1], pt[2]]:
        nbhd.append((pt[0]-1, pt[1], pt[2]))
    if (pt[1] > 0) and not checked[pt[0], pt[1]-1, pt[2]]:
        nbhd.append((pt[0], pt[1]-1, pt[2]))
    if (pt[2] > 0) and not checked[pt[0], pt[1], pt[2]-1]:
        nbhd.append((pt[0], pt[1], pt[2]-1))

    if (pt[0] < dims[0]-1) and not checked[pt[0]+1, pt[1], pt[2]]:
        nbhd.append((pt[0]+1, pt[1], pt[2]))
    if (pt[1] < dims[1]-1) and not checked[pt[0], pt[1]+1, pt[2]]:
        nbhd.append((pt[0], pt[1]+1, pt[2]))
    if (pt[2] < dims[2]-1) and not checked[pt[0], pt[1], pt[2]+1]:
        nbhd.append((pt[0], pt[1], pt[2]+1))

    return nbhd
Testing the Python implementation
So, we have the test data, and now let’s finally test the python implementation above. Supposing the grow function is defined in file called region_growing_python:
import time
import region_growing_python as rgp

seed = (11,45,35)

start = time.time()
seg = rgp.grow(vol, seed, 5)
stop = time.time()

print("Elapsed time: %.3f seconds." % (stop - start))
print("Errors: %d" % np.logical_xor(w <= -11, seg).sum())

src = mlab.pipeline.scalar_field(seg.astype(np.float))
mlab.pipeline.iso_surface(src, contours=[0.5], opacity=0.5)
mlab.show()
Upon running the above code, you should see something like:
Elapsed time: 1.192 seconds.
Errors: 0
and a corresponding image of the inner structure that we hoped to pick out:
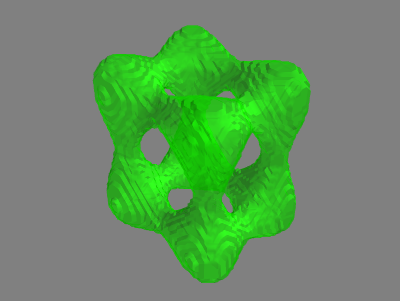
Alternatively, we could set seed = (45,38,35) and pick out the outer shell:
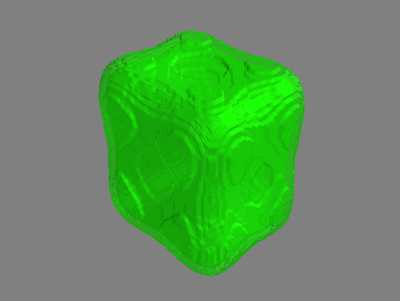
So, it appears to be working!
C Implementation
We’ll start by writing the implementation in C, and then we’ll wrap the C implementation in Python by using f2py.
A simple stack structure
First, we need to write a minimal stack data structure using a singly linked list.
So, we’ll create a file stack.h containing the following:
#ifndef STACK_H
#define STACK_H

#include <stdlib.h>
#include <stdio.h>

// Stack element struct.
// This is a node of singly linked list.
typedef struct element {
    struct element * next;
    int i,j,k;
} element;

// Stack "element" struct.
// The struct has pointer to the next element
// and data, which is three integers, (i,j,k).
typedef struct stack {
    int n_elements;
    element * top;
} stack;

void stack_init(stack * S) {
    S->n_elements = 0;
    S->top = NULL;
}

void element_init(element * el, int i, int j, int k) {
    el->next = NULL;
    el->i = i;
    el->j = j;
    el->k = k;
}

void stack_push(stack * S, element * el) {
    // Increment number of elements.
    S->n_elements++;
    // Set el to point to current stack top as its next element.
    el->next = (S->top);
    // Set el to be the top element of S.
    S->top = el;
}

element * stack_pop(stack * S) {
    element * el;

    if (S->n_elements == 0) {
        // Return NULL pointer if stack is empty.
        return NULL;
    }
    else {
        // Decrement stack count and set `el` to the top element of stack.
        S->n_elements--;
        el = S->top;

        // If stack is empty after pop, then set the top element
        // to the NULL pointer. Otherwise, set the stack top to the
        // next element after top.
        if (S->n_elements == 0)
            S->top = NULL;
        else
            S->top = el->next;

        return el;
    }
}
#endif
… and a quick test program to make sure the stack is working correctly (call it stack_check.c) …
#include <stdio.h>
#include "stack.h"

int main() {
    stack S;
    element * el;
    int N = 3;

    stack_init(&S);

    for(int i=0; i < N; i++) {
        el = (element *) malloc(sizeof(element));
        element_init(el, i, i, i);
        stack_push(&S, el);
        printf("Stack top->i after push: %d\n", S.top->i);
    }

    for(int i=0; i < N; i++) {
        printf("n_elements before pop: %d\n", S.n_elements);
        el = stack_pop(&S);
        printf("n_elements after pop: %d\n", S.n_elements);
        free(el);
    }

    return 0;
}
which gives (after gcc stack_check.c stack.h && ./a.out)
Stack top->i after push: 0
Stack top->i after push: 1
Stack top->i after push: 2
n_elements before pop: 3
n_elements after pop: 2
n_elements before pop: 2
n_elements after pop: 1
n_elements before pop: 1
n_elements after pop: 0
Or maybe more importantly, running valgrind ./a.out gives:
...
==16847== ERROR SUMMARY: 0 errors from 0 contexts (suppressed: 0 from 0)
:+1: moving on …
The region growing function in C
Let’s now create a file called region_growing.c. At the top, we’ll include the necessary libraries
#include <stdio.h>
#include <stdlib.h>
#include <stdbool.h>
#include "stack.h"
Next, we’ll write a function that maps a 3-tuple index to a “flat” index into the 3D array stored in row-major given the dimensions of the 3D volume:
// Map the index (i,j,k) to an index l, the "flat" index
// into the row-major 3D array of dimensions, (m,n,p).
int inline map_index(int i, int j, int k, int m, int n, int p) {
    return n*p*i + p*j + k;
}
This function is a perfect candidate for inlining, so we’ve done so.
Next, we write the analog of get_nbhd from the Python implementation. This function was already pretty verbose in the Python version and becomes even more so (unsurprisingly) in the C version:
// Add voxels coordinates in the 6-voxel neighborhood of (i,j,k)
// to the stack, S, if the coordinate is not in `checked`.
void add_neighbors(int i, int j, int k, int m, int n, int p,
                   stack * needs_check, bool * checked) {
    int l;
    element * el;

    if (i >= 1) {
        l = map_index(i-1,j,k,m,n,p);
        if (!checked[l]) {
            el = (element *) malloc(sizeof(element));
            element_init(el, i-1, j, k);
            stack_push(needs_check, el);
        }
    }

    if (j >= 1) {
        l = map_index(i,j-1,k,m,n,p);
        if (!checked[l]) {
            el = (element *) malloc(sizeof(element));
            element_init(el, i, j-1, k);
            stack_push(needs_check, el);
        }
    }

    if (k >= 1) {
        l = map_index(i,j,k-1,m,n,p);
        if (!checked[l]) {
            el = (element *) malloc(sizeof(element));
            element_init(el, i, j, k-1);
            stack_push(needs_check, el);
        }
    }

    if (i < m-1) {
        l = map_index(i+1,j,k,m,n,p);
        if (!checked[l]) {
            el = (element *) malloc(sizeof(element));
            element_init(el, i+1, j, k);
            stack_push(needs_check, el);
        }
    }

    if (j < n-1) {
        l = map_index(i,j+1,k,m,n,p);
        if (!checked[l]) {
            el = (element *) malloc(sizeof(element));
            element_init(el, i, j+1, k);
            stack_push(needs_check, el);
        }
    }

    if (k < p-1) {
        l = map_index(i,j,k+1,m,n,p);
        if (!checked[l]) {
            el = (element *) malloc(sizeof(element));
            element_init(el, i, j, k+1);
            stack_push(needs_check, el);
        }
    }
}
Moving along, in the C version, we’ll separate out the inclusion criteria check (which we did not do for Python version). This function could be overwritten to use all kinds of inclusion checks, but the main reason for separating out here is because we have to compute the neighborhood average of image values ourselves, rather than relying on built-in NumPy functions.
// Here we check if the coordinate (i,j,k) is included in the foreground
// of the segmentation by computing the average image value in the
// neighborhood of (i,j,k) and check whether the image value at (i,j,k)
// is greater than or equal to the neighborhood average.
//
// The neighborhood is defined as {i-t, ... , i+t} and similarly
// for j and k where `t` is supplied. Points beyond the border
// are not considered.
bool check_inclusion(int i, int j, int k,
                     int m, int n, int p,
                     double * img, int t) {
    double sum;
    int imin, imax, jmin, jmax, kmin, kmax;
    int count,l;

    // Handle lower borders.
    imin = i-t; imin = imin < 0 ? 0 : imin;
    jmin = j-t; jmin = jmin < 0 ? 0 : jmin;
    kmin = k-t; kmin = kmin < 0 ? 0 : kmin;

    // Handle upper borders.
    imax = i+t; imax = imax > m-1 ? m-1 : imax;
    jmax = j+t; jmax = jmax > n-1 ? n-1 : jmax;
    kmax = k+t; kmax = kmax > p-1 ? p-1 : kmax;

    sum = 0.0;
    count = 0;

    // Compute the neighborhood average.
    for(int ii=imin; ii <= imax; ii++) {
        for(int jj=jmin; jj <= jmax; jj++) {
            for(int kk=kmin; kk <= kmax; kk++) {
                l = map_index(ii,jj,kk,m,n,p);
                sum += img[l];
                count += 1;
            }
        }
    }

    l = map_index(i,j,k,m,n,p);

    // The coordinate (i,j,k) is included if img[i,j,k]
    // is greater than or equal to neighborhood average.
    return (img[l] >= (sum / count));
}
Almost there. Lastly, we write the grow method, which actually implements the region growing procedure:
void grow(int m, int n, int p,
          double * img, bool * seg,
          int si, int sj, int sk, int t) {
    int l, i, j, k;
    bool checked[m*n*p]; // indicator of coordinates already checked.
    stack needs_check;   // stack of coordinates to check.
    element * el;

    // Initialize the segmentation and `checked` indicator boolean arrays.
    for(int ii=0; ii < m*n*p; ii++) {
        seg[ii]     = false;
        checked[ii] = false;
    }

    // Initialize the stack.
    stack_init(&needs_check);

    // The segmentation and `checked` arrays are `true` at the seed voxel.
    l = map_index(si,sj,sk,m,n,p);
    seg[l]     = true;
    checked[l] = true;

    // Add the neighbors of the seed point to the stack.
    add_neighbors(si, sj, sk, m, n, p, &needs_check, checked);

    while (needs_check.n_elements > 0) {
        // Pop a coordinate from the stack.
        el = stack_pop(&needs_check);
        // Record the coordinate data from the stack element.
        i = el->i; j = el->j; k = el->k;
        // Free the stack element.
        free(el);

        l = map_index(i, j, k, m, n, p);

        // Check if the coordinate was placed in the stack twice
        // and continue to the next iteration if so.
        if (checked[l]) continue;

        // Otherwise marked the voxel as checked and proceed.
        checked[l] = true;

        // Set segmentation to true if neighborhood criteria satisfied.
        if (check_inclusion(i, j, k, m, n, p, img, t)) {
            // Mark the segmentation voxel as included.
            seg[l] = true;
            // Add potential neighbors to the stack.
            add_neighbors(i, j, k, m, n, p, &needs_check, checked);
        }
    }
}
Writing the f2py signature file
Next, we should write a “signature” file so f2py knows the names of things and what the types of the arguments are. Create a file called region_growing.pyf:
python module region_growing
interface
    subroutine grow(m, n, p, img, seg, si, sj, sk, t)
        intent(c) grow
        intent(c)

        integer intent(hide), depend(img) :: m = shape(img,0)
        integer intent(hide), depend(img) :: n = shape(img,1)
        integer intent(hide), depend(img) :: p = shape(img,2)

        double precision intent(in) :: img(m,n,p)
        integer(kind=1) intent(out) :: seg(m,n,p)
        integer intent(in)          :: si, sj, sk, t
    end subroutine grow
end interface
end python module region_growing
We made the dimensions of the img array implicit by making the variables m,n,p hidden, and by telling f2py that they should be extracted from the provided img argument. Why do we use type integer for seg instead of boolean? In my experience, f2py can be a little funny when passing boolean arrays to Fortran or C, so it’s easier to just let seg be integer type. This is why in the grow C routine, we let checked be a boolean-valued array, but seg was integer type. The reason here was that checked was local to the C program and not passed to Python.
Makefile
Finally, let’s write a make file that calls f2py:
all:
	gcc -c stack.h # not sure if this line is necessary ...
	f2py region_growing.pyf -c stack.h region_growing.c -m region_growing
Running make from the terminal creates a region_growing.so module that can by imported from Python.
Testing the Python-wrapped C implementation
Assuming vol and other variables defined as before, let’s test it out:
seed = (11,45,35)

start = time.time()
segpy = rgp.grow(vol, seed, 5)
stop = time.time()

print("(Python) Elapsed time: %.3f seconds." % (stop - start))
print("(Python) Errors: %d" % np.logical_xor(w <= -11, segpy).sum())

segc = np.zeros(vol.shape, dtype=np.int8)
start = time.time()
rgc.grow(vol, segc, seed[0], seed[1], seed[2], 5)
stop = time.time()

print("(C)      Elapsed time: %.3f seconds." % (stop - start))
print("(C)      Errors: %d" % np.logical_xor(w <= -11, segc).sum())
If all goes correctly, you should observe something like:
(Python) Elapsed time: 1.189 seconds.
(Python) Errors: 0
(C)      Elapsed time: 0.074 seconds.
(C)      Errors: 0
$1.189 / 0.074 \approx 16$. That’s a speed-up of nearly a factor of 16! Of course, this factor will change if we use a image neighbor value larger than 5 as was tested here. Something to note is that in the above, the array returned by the C-wrapped function will actually be of type int8. For reasons that are unknown to me, f2py doesn’t care for accepting boolean types from NumPy and requires int8 instead. Generally, you have to be pretty careful when passing different types using f2py because you can observe strange results that might not appear as blatant errors.
In the figure below, I’ve plotted the run times for the Python and C codes (and their ratio) averaged over 10 runs for image neighborhood radius size of $1,5,10,15,$ and $25$ (I’m using the term radius, but we really mean cube-half-length). This means at each coordinate where we check for inclusion, we must compute the average over a volume of size $(2 \cdot 1+1)^3, (2\cdot 5 + 1)^2$, etc. Notable speed increases happen within the 1 to 15 pixel radius range. For larger neighborhood sizes, the averaging operation dominates the code, and since the NumPy average is implemented in C, it is not too surprising that the relative speed increase obtained by the pure C code begins to vanish.
Also, note that for very large image averaging neighborhood sizes, region growing is essentially equivalent to first performing a global threshold (because every “neighborhood” includes the entire image), followed by a connected component analysis from the chosen seed point.
